
Protecting Your Digital Legacy
A practical collection of resources, guides, and tools to help you prepare for digital legacy challenges before they become emergencies.
It's Time To Be Proactive For Your Loved Ones
Don’t put your executor or authorized decision-makers through the frustration of not being able to access critical online assets in an unexpected situation.
This resource page supports anyone preparing dealing with digital legacy challenges, whether you are just starting to think about estate planning, or have been worrying for some time about what will happen to your accounts and digital assets after you die.
Check out the resources on this page to learn more about why “digital legacy planning” means more than just having a list of passwords you assume your loved ones will find, and get some quick tips that will simplify the process of granting access to major platforms like Apple, Google and Microsoft.
An even better way to keep your momentum going, and to stay plugged into my tools and tips is to sign up for my newsletter updates. Just fill in the form on the right, and you’ll receive my regular news with practical insights…
Keep Your Momentum Going
It can be hard to keep going without reminders.
Start Here
Setting up digital legacy or emergency contacts with major online platforms
Note that some of the platforms below do not have specific mechanisms for designating a legacy or emergency contact. In those cases, it is vital that your password is saved and that any two-factor authentication devices are also accessible by your trusted contact.
🍎 Apple (Digital Legacy / iCloud)
Quick tip:
- Add a Legacy Contact in your Apple ID settings
- Your contact needs an access key + death certificate to request data
🔍 Google (Gmail, Drive, Photos, YouTube)
Quick tip:
- Set inactivity period (3–18 months or more)
- Add trusted contacts and choose what data they receive
- Optionally auto-delete your account
- 👉 (Use in-page help link or search: “Facebook legacy contact settings”)
- This link may work:
Quick tip:
- Choose a Legacy Contact to manage your memorialized account
- They can post updates, manage tributes, and update profile settings
- They cannot log in or read private messages
Quick tip:
- No true “legacy login” feature
- Accounts can be memorialized or deleted upon request
- Option to allow legacy contact to download personal data OR NOT
- Requires proof of death (e.g., obituary)
💼 Microsoft (Outlook, OneDrive, etc.)
- 👉 Info available at: Microsoft Account Access After Death
Quick tip:
- NOTE: No pre-configured legacy access
- Access may require legal process (e.g., court order/subpoena)
- Plan ahead—don’t rely on recovery later
🛒 Amazon (and similar services)
- 👉 Amazon Help (search: “close account of deceased user”)
Quick tip:
- No legacy feature
- Executors must contact support and provide documentation
- Plan for password and 2FA access by Authorized Decision-Maker
Password Manager Primer
Setting up Bitwarden free password manager
A password manager helps you create, store, and safely access strong passwords for all your accounts—so you don’t have to remember them. Security professionals recommend using a password manager program when you have multiple online accounts, so that each account can be secured with a different, unique and strong password, as long as you use a long, strong master password that is not guessable or easy for an attacker to find.
While I describe the process for setting up the Bitwarden password manager below, I do not have any affiliation with Bitwarden. I use it myself, and am familiar with its features. You may prefer using others such as Dashlane, 1Password, KeyPass or LastPass. I am not claiming that any of these products is “the most secure” way to store passwords. But they are used by many people, which means that there is a lot of scrutiny on their security practices. This doesn’t mean they will never suffer security incidents.
Even though they aren't perfect, the risks of not using a password manager (e.g. using the same password that you can remember everywhere) are generally considered to be greater than those of using a reputable one, along with good security best practices.
For the purposes of reducing risks from your loved ones not being able to access your online accounts when you die, and to make it relatively easy for you to document your “digital legacy”, this is what I recommend. But it is up to you, and perfectly fine if you prefer to have a "hard copy" book of passwords that you keep in a secure location.
If you decide to use a password manager, and you don't know where to start, you can follow these steps to get set up with Bitwarden, one of the most common and reputable password managers. It has a free plan that anyone can subscribe to. You may wish to shop around and use a different password manager program. However, these instructions can be used as a general procedure for setting up any password manager program. The all work in similar ways, and you can find good documentation on all of the major ones.
You may also want to reference the series of Bitwarden 101 videos on YouTube to see demonstrations for some of the basic steps below.
A) Create Your Bitwarden Account
- Go to: https://bitwarden.com
- Click Get Started or Create Account
- Enter your email address
- Create a strong master password (see tips below)
- Write down a password hint (optional but helpful)
✅ Important: Your master password is the *only password you need to remember—and it cannot be recovered if lost.
B) Create a Strong Master Password
Use something that is:
- Long (at least 12–16 characters)
- Easy for you to remember, hard for others to guess
✅ Example approach:
- Combine random words:
Maple Bridge Ocean Coffee!(only an example; use your own words)
❌ Avoid:
- Personal info (birthdays, names)
- Reusing any existing password
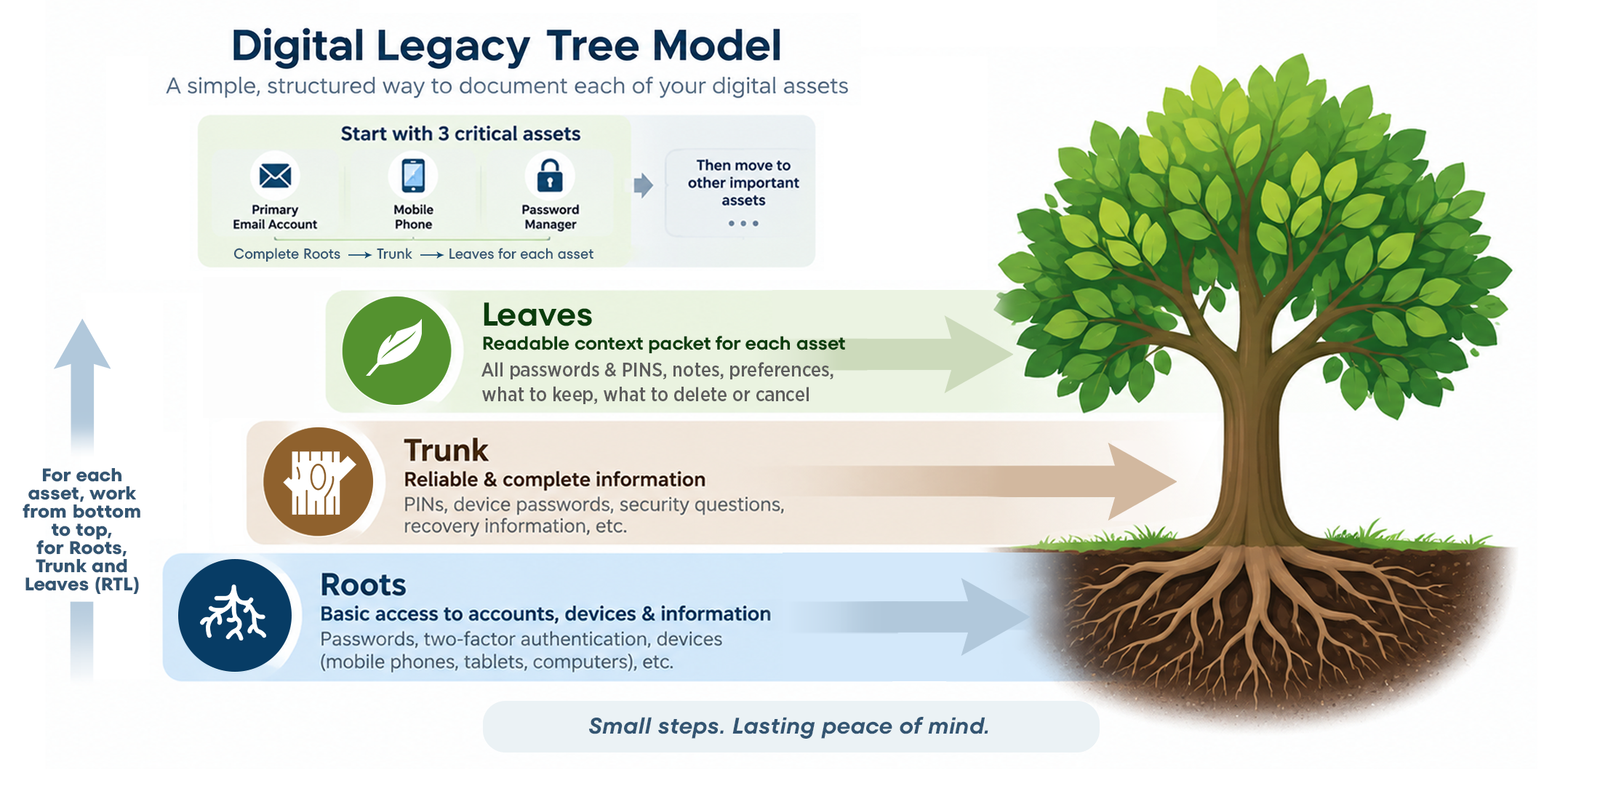
💡 Consider writing your master password down and storing it in a secure physical location (like a safe), as described in the book The Digital Legacy Tree: Ensuring your loved ones have access to what they need when you’re gone.
C) Install Bitwarden on Your Devices
To make it easy to use daily:
- On your computer: install the browser extension (Chrome, Edge, Firefox, etc.)
- On your phone: install the Bitwarden app from the App Store or Google Play
- Log in with your email and master password
- You’re now ready to start saving passwords
D) Save Your First Password
The next time you log in to a website:
- Enter your username and password as usual
- Bitwarden will prompt: “Save this login?”
- Click Yes
✅ That’s it—Bitwarden will remember it for you
E) Use Bitwarden to Log In
Next time you visit that site and see the fields for entering your username and password on the login page:
- Click the Bitwarden icon in your browser (or you may see the entry pop up when you click in the login fields, which you can click on)
- If the field doesn't fill in or pop up automatically, look for the saved login, and click the Fill link in the record that matches the website
✅ No more typing or remembering passwords
F) Store Your Existing Passwords (One at a Time)
Start adding your passwords to the passwod manager gradually:
- Visit an important account (email, bank, etc.)
- Enter the password
- Use the password manager's password save feature to store it
- If you want, you can use the site's "change password" or "forgot password" feature to change the password and save it in the password manager
- Password managers can also generate strong random passwords for each site and store them, so you don't need to remember them
- Save it when prompted
✅ Focus on your most important accounts first
G) Turn On Two-Factor Authentication, also called 2FA, MFA or two-step login (Optional but Recommended)
This adds an extra layer of protection:
- In Bitwarden, go to Settings → Security → Two-step login
- Follow the steps to link an authenticator app or email code
✅ Once activated, even if someone gets your password manager's master password, they would need to also have the code provided on your device, which only you should have
H) Save Your Emergency Backup Codes (Critical if you did #7 above)
When you enable two-step login, Bitwarden provides backup codes you can use if you lose access to your phone or authentication app. You will still need your password, but will not need the 2FA code from your device.
- After setting up two-step login, look for Recovery Code or Backup Codes
- Copy or download the codes provided
- Store them in a safe, offline location:
- Printed and kept with important documents
- Stored in a secure physical file or safe
✅ Keep these separate from your devices
⚠️ Anyone with these codes can access your vault if they have your Bitwarden password, so treat them with the same security as you would a password.
I) Back Up Your Bitwarden access information (Very Important)
Make sure someone you trust can access your digital life if needed:
- Write down:
- Your Bitwarden email
- Where your master password is stored (not the password itself)
- Keep this with your important documents
💡 This step is key part of your Digital Legacy Tree planning process, if you are following the book's methodology
J) Use the Password Manager Daily (Keep It Simple)
- Let Bitwarden remember passwords for you
- Use it whenever you log in
- Add new accounts as you go
✅ You don’t need to store everything at once—just start
🔐 Simple Best Practices for Passwords...
- Never reuse passwords across sites
- Always lock your device when not in use
- Keep your master password private, in a secure location
- Update important passwords once per year, or if you think any of them have been compromised
✔️ That’s It!
You now have a secure foundation for managing your passwords—and protecting your digital legacy.